Environment Management
Managing development environment, creating tests and monitoring test coverage, generating documentations, versioning the package. These are some common themes that I always find myself googling for solutions. In part 1 of the series, I am going to go through my current setup for environment management.
It is important to manage your development environment right. Without proper attention to this, you can end up with packages that are not re-distributable and only runnable on your machine. It can be also hard to onboard collaborators.
Having a separate environment for your package, instead of a global one, will prevent other projects from contaminating your project. For example, you might be developing a package that requires a specific version of pandas, say 0.24, while another package has already onboarded with pandas 1.0. Using global environments will cause conflicts and compatibility issues in one of the 2 packages.
Virtual Environments
To have an isolated environment, the first step is to use what Python called virtual environments.
pipenv
My preferred package manager is pipenv. You can install it via
brew install pipenvif you are on a Mac, or
pip install pipenvotherwise. When you use pipenv, it will generate 2 files. Pipfile and Pipfile.lock. You should focus on getting contents in Pipfile right. You can read more about them here. It looks like this
[[source]]
name = "pypi"
url = "https://pypi.org/simple"
verify_ssl = true

[dev-packages]
versioneer = ">=0.18"
twine = "*"

[packages]
requests = ">=2.22.0"
pandas = "*"

[requires]
python_version = "3.7"
[dev-packages] are packages only required by package developers. Here, we have versioneer which is used for versioning the package, and twine for uploading the package to PYPI. [packages] are dependency needed for the package to function correctly.
Key commands
To install package dependencies, run:
pipenv install [name-of-the-package]To install development dependencies, run:
pipenv install [name-of-the-package] --devTo activate the environment, run
pipenv shelland all your normal “python” commands now runs in the virtual environment with controlled dependencies. Some text editors and IDEs also supports pipenv natively. e.g. You can select pipenv as your interpreter in VS Code, and have the code runner run code through pipenv directly.
Also, make sure to install the package you are working on as a dev dependency, so your testing and other tooling can work in the virtual environment. Run
pipenv install -e . --devYou should version control (using git or svn, I won’t judge you) both Pipfile and Pipfile.lock. When you moved to a new machine, to restore your current environment, in the project’s directory, run
pipenv installand this will install all the specified files in Pipfile.
Lastly, if you want to generate
requirements.txt, you can runpipenv run pip freeze > requirements.txt
venv
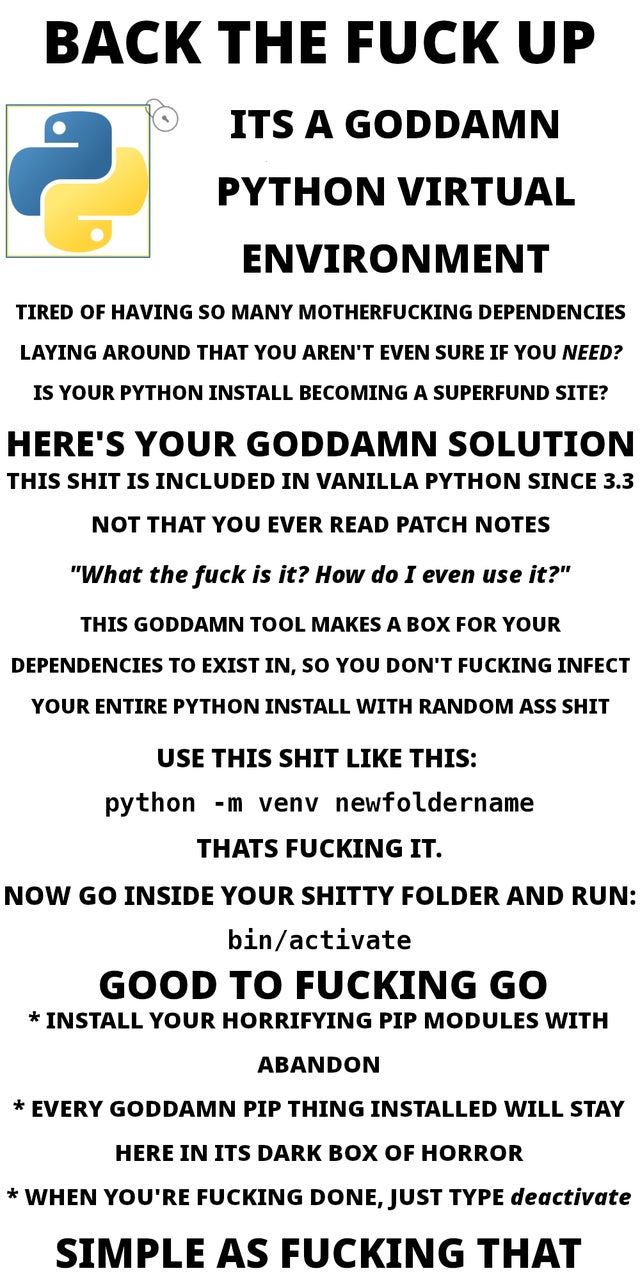
Since Python 3.3, Python ships with its own venv package manager. We are not going to introduce venv here, but I thought the following meme is rather informative:
Dockerize Your Environment
Virtual Environments are great. However, there can still be dependencies on your OS that cannot be controlled through virtual environments. e.g. some packages cannot be installed correctly in Windows due to lack of built tools. If you are familiar with basic commands in Linux (e.g. cd, ls, mkdir, rm), I recommend you to dockerize your environment, and ship your project with a Dockerfile.
Docker provides containerized solutions for environment management, and you can see containers as light weight virtual machines. Dockerfile configures how the virtual machine should be setup.
Below is an example, where the docker container is configured to create a base environment based on continuum‘s miniconda, and then extended to install packages stored in the requirement.txt file in the working directory. You’ll then have to build and run the container.
FROM continuumio/miniconda3
COPY requirements.txt /tmp/
RUN pip install --requirement /tmp/requirements.txt
CMD [ "/bin/bash" ]
So why is this useful? As mentioned earlier, you’ll not only replicate package dependencies, but system dependencies via docker. This will basically create a Linux container for you develop your package, whether you are on MacOS, Windows, or other OS.
How can I make use of this? A docker container is like any other remote machine, and you’ll be able to attach it to your IDE so you can run your entire development within the container. For example, in VS Code, you can accomplish this via the Remote - Containers extension.
Minimal Example
Here, I’ve created a minimal example. This assumes you are on a Mac (Linux should work too).
In the root directory, I’ve supplied a dockerfile, which pull’s from Python’s official docker image, and install pytest as a dev package via pipenv.
To run the docker container, you’ll need to build it once first. Simply run the scripts/docker_build.sh file to do this.
Once the image is build, run scripts/docker_run.sh, and this will start a docker container you can use for your development in the background.