Jira is an extremely useful and popular tool in software development to manage project flows and progresses. In this post, I am going to show you how you can host your own Jira server at home, expose it to the internet, make use of its mobile app, and link it with slack.
This article is designed for Mac/Linux users, although Windows users may find some parts of it useful, too.
Getting started
Setup a machine to host Jira
First off, you’ll need a machine at home to host Jira itself. Since the machine is going to be exposed to the internet, I recommend using a machine just for Jira. This can be an old computer you no longer use, or a virtual machine running inside another system. Personally, I used VMWare and Ubuntu Server 18.04.
For the virtual machine, make sure its network is in bridged mode so it gets assigned its own ip address. This is important later on when we want to expose it online.
You can download VMWare from here and Ubuntu Server from here. Note that for the Ubuntu Server, we are going to SSH onto it and manipulate files within the command line using Vim or any other command line text editor. If you are not comfortable with the terms I’ve just mentioned, feel free to download the desktop version of Ubuntu here. We’ll not cover how to install a virtual machine in VMWare in this article, but it should be fairly straight forward.
SSH to your machine (optional)
You can skip this section if you are using a desktop version of Linux. Once you turn on your Linux server, get its ip address via
ip aand you should see something like
username@jira:~$ ip a
1: lo: <LOOPBACK,UP,LOWER_UP> mtu 65536 qdisc noqueue state UNKNOWN group default qlen 1000
    link/loopback 00:00:00:00:00:00 brd 00:00:00:00:00:00
    inet 127.0.0.1/8 scope host lo
       valid_lft forever preferred_lft forever
    inet6 ::1/128 scope host
       valid_lft forever preferred_lft forever
2: ens33: <BROADCAST,MULTICAST,UP,LOWER_UP> mtu 1500 qdisc fq_codel state UP group default qlen 1000
    link/ether
    inet 192.168.0.123/24 brd 192.168.0.255 scope global ens33
       valid_lft forever preferred_lft forever
    inet6  scope link
       valid_lft forever preferred_lft forever
In here, 192.168.0.123 is your ip, and you’ll be able to ssh to the server by starting a terminal window on your local (non-vm) computer and type
ssh [username]@192.168.0.123You’ll need to substitute [username] with your actual username on the server, and it will prompt for your password.
Setup Jira
Download Jira
Open up a terminal, type
cd ~
wget https://www.atlassian.com/software/jira/downloads/binary/atlassian-jira-software-8.3.3-x64.bin
This should download the Jira installation binary in your user folder. To get the latest version, check with Atlassian’s website and update the link in wget accordingly.
Once you have this downloaded, do a ls command and you should see it in your directory.
username@jira:~$ ls
atlassian-jira-software-8.3.3-x64.bin
Set it aside for now.
Setup Postgresql 9.6
Jira needs a database to store user information and other data. It supports MySQL, Postgresql, Oracle and SQL Server. My choice is Postgresql, as it saves you the trouble of finding the JDBC driver you’ll need if you use MySQL, and money you’ll have to pay if you choose Oracle/SQL Server.
Right now, Jira is compatible with Postgresql 9.4, 9.5, 9.6 and ships with JDBC connector. Below are the instructions from stakoverflow for installing Postgresql 9.6.
sudo sh -c 'echo "deb http://apt.postgresql.org/pub/repos/apt/ `lsb_release -cs`-pgdg main" >> /etc/apt/sources.list.d/pgdg.list'
wget -q https://www.postgresql.org/media/keys/ACCC4CF8.asc -O - | sudo apt-key add -
sudo apt-get update
sudo apt-get upgrade
sudo apt-get install postgresql-9.6
Create user and database for Jira
Start Postgresql
To create user and database for Jira, we’ll first need to start the database application. You can type
sudo -u postgres psqlto start it.
Creating an user for Jira
To create a user, type
create user myuser with encrypted password 'mypass';Note you should see the postgres=#prefix when you are in the postgres app. You should swap myuser and mypass with the username and password you’ll want to use for your Jira database.
Creating a database for Jira
Next up, you’ll also need a database for Jira and grant the user you’ve set up above with appropriate privileges. A detailed official instruction can be found here. In summary, type the following lines in your terminal:
CREATE DATABASE jiradb WITH ENCODING 'UNICODE' LC_COLLATE 'C' LC_CTYPE 'C' TEMPLATE template0;
GRANT ALL PRIVILEGES ON DATABASE jiradb TO myuser;
In here, jiradb is the name we’ve used for the database for Jira. You can change it to anything that pleases you. Similarly, myuser is the user we set up in the section above.
Once you are done, enter \q to quit Postgres.
Install Jira
With your binary ready and database set up, we are ready to install Jira. A detailed rundown can be found here. The highlights are the following commands:
cd ~
chmod a+x atlassian-jira-software-8.3.3-x64.bin
sudo ./atlassian-jira-software-8.3.3-x64.bin
Swap 8.3.3 with the Jira version you have in hand.
Final Jira setups
Now, to finalize your setup, go to http://localhost:8080 and you should see:
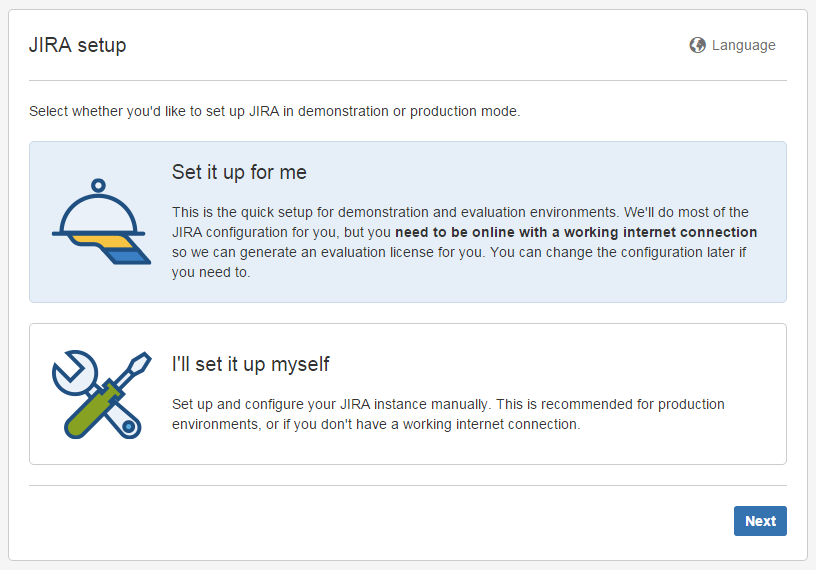
Choose “I’ll setup it up myself”. It should take you to the next screen. On the next screen, choose “Your Own Database”. Then select “Postgresql”. The host will be localhost, and the database/user/password will be the ones you’ve set up beforehand.
For the rest of your installation, follow the instructions and you should be ready to go! Now, on your local network, you should be able to access Jira via 192.168.0.123:8080, where 192.168.0.123 is your machine’s IP. Enjoy!
Expose Jira to the web
Now you want to be able to visit your Jira from anywhere, not just from home. How do you do this? There are several ways to do it, the simplest being having a VPN connection to your home and you’ll still be able to connect to your Jira server via the same ip address. Here, we are going to talk about something different.
Set static local IP for the server
Before we go any further, the first thing to do is to make sure we have a static local IP address. A guide can be found here. In short, you are going to edit your /etc/netplan/50-cloud-init.yaml so it have the following content:
network:
    ethernets:
        ens33:
            dhcp4: no
            addresses: [192.168.0.123/24]
            gateway4: 192.168.0.1
            nameservers:
                addresses: [8.8.8.8, 8.8.4.4]
    version: 2
Note the addresses row should be the IP address you’d like to use for the server, and the gateway4 is the IP address for the router/gateway you have.
Forward port on your router
Once you have a static ip address, go to your router and forward port 8080 of the server to the outside world. On my Asus router, the setup looks like the following:
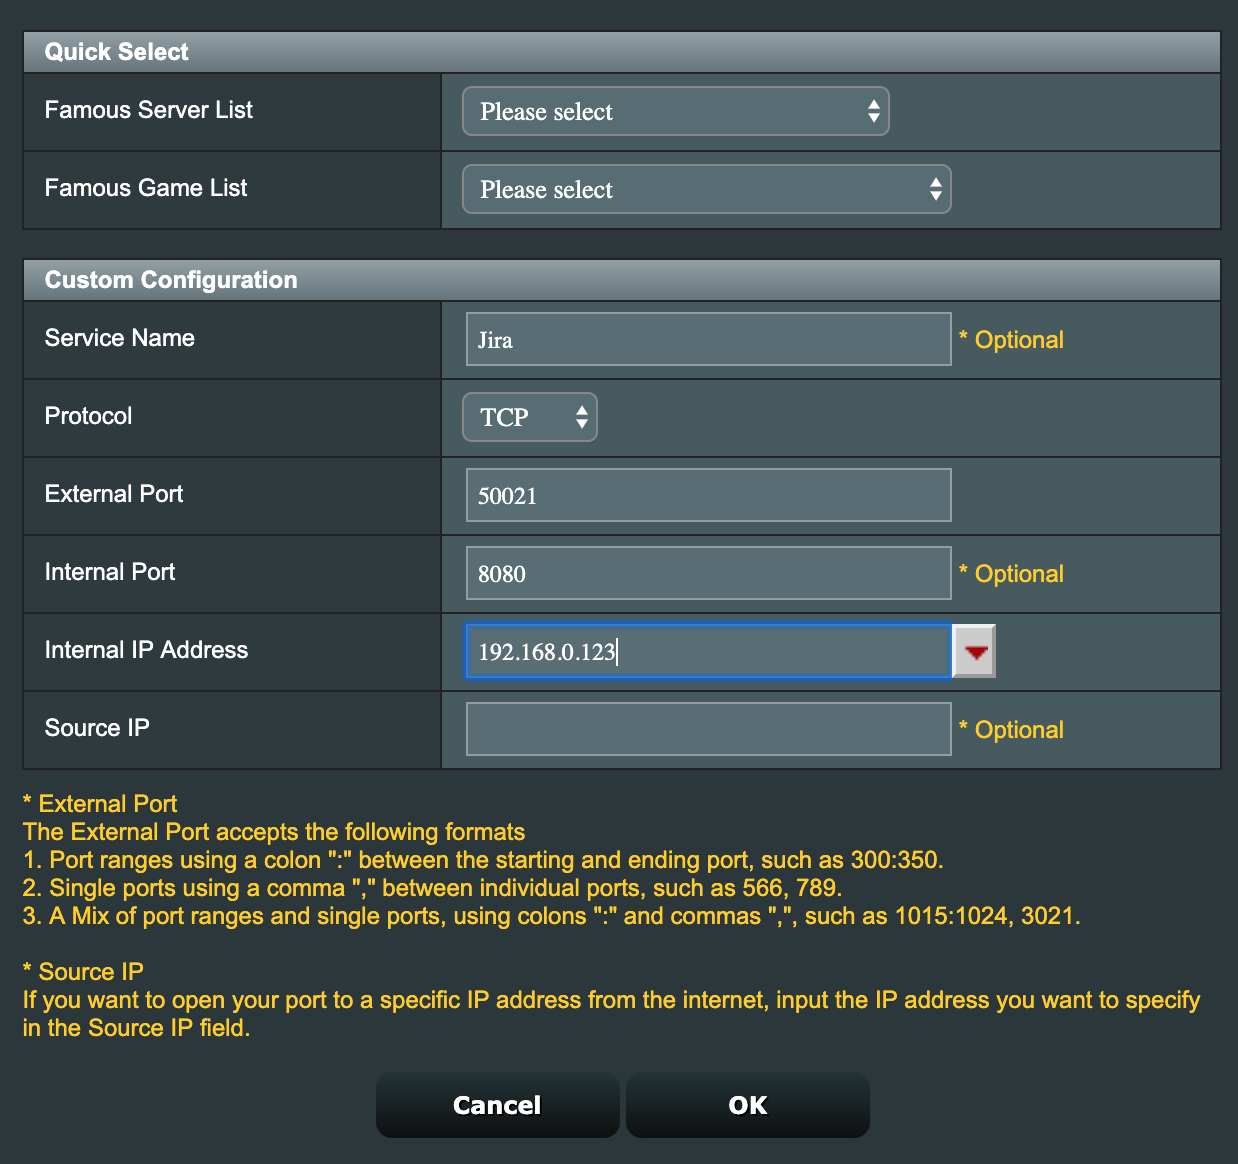
Here, 50021 is the outside port you’ve exposed it to. You can use any other port, although I recommend using a number between 10000 and 99999.
Find out your public IP address
In Google, type in My IP, and it will tell you your public IP address. Say it is 108.11.33.55, then you’ll be able to access Jira via http://108.11.33.55:50021, where 50021 is the port you’ve set up in the port forwarding section above.
Using the Jira mobile app
Jira Server app is available in Appstore. Search Jira in Appstore and download the following app.
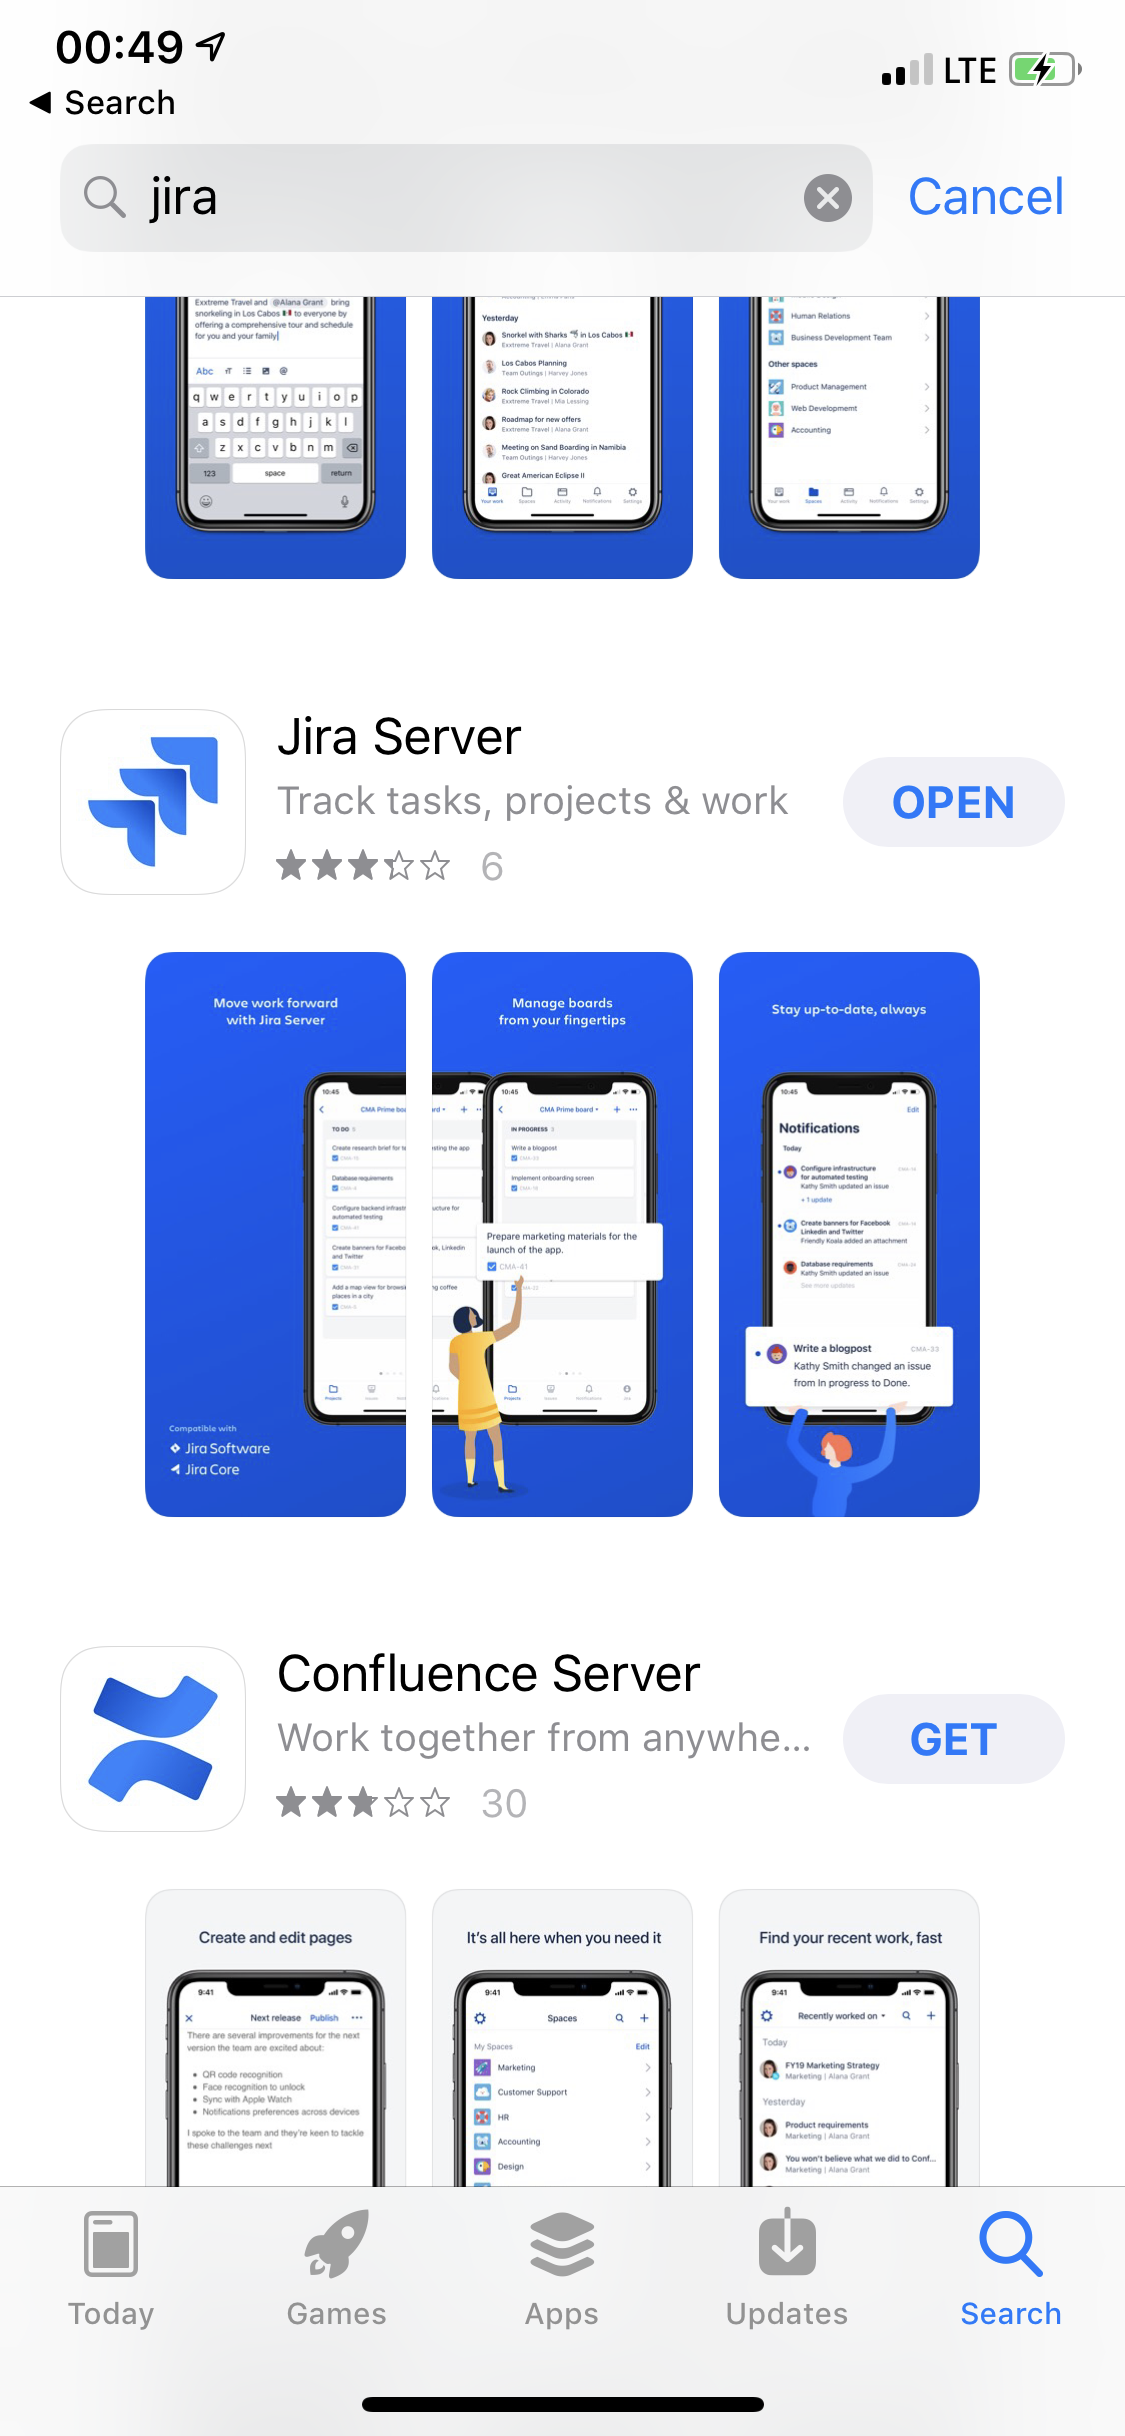
Open the Jira App, enter the link we’ve produced above, and you should be able to login to your Jira and start using the app!

Start and stop Jira service
To start and stop Jira service:
sudo /etc/init.d/jira stop
sudo /etc/init.d/jira start
Setup HTTPS
Having a trusted and encrypted connection is important for your privacy and security. This is also a prerequisite for using the Slack plugin for Jira. To be able to do this, you’ll need a URL.
I have used namecheap.com for my URL service. They’ve done a good job and it’s simple to setup.
To setup https, I recommend using let’s encrypt with the following guide.
Please comment below for any questions!